Setting up a virtual environment
This tutorial will teach you in just a few steps how to create and use a virtual environment with Python.
Prerequisites
- Have Python installed on your machine.
- Have a text editor for Python (Visual Studio Code, Pycharm, etc.).
Why setting up a virtual environment?
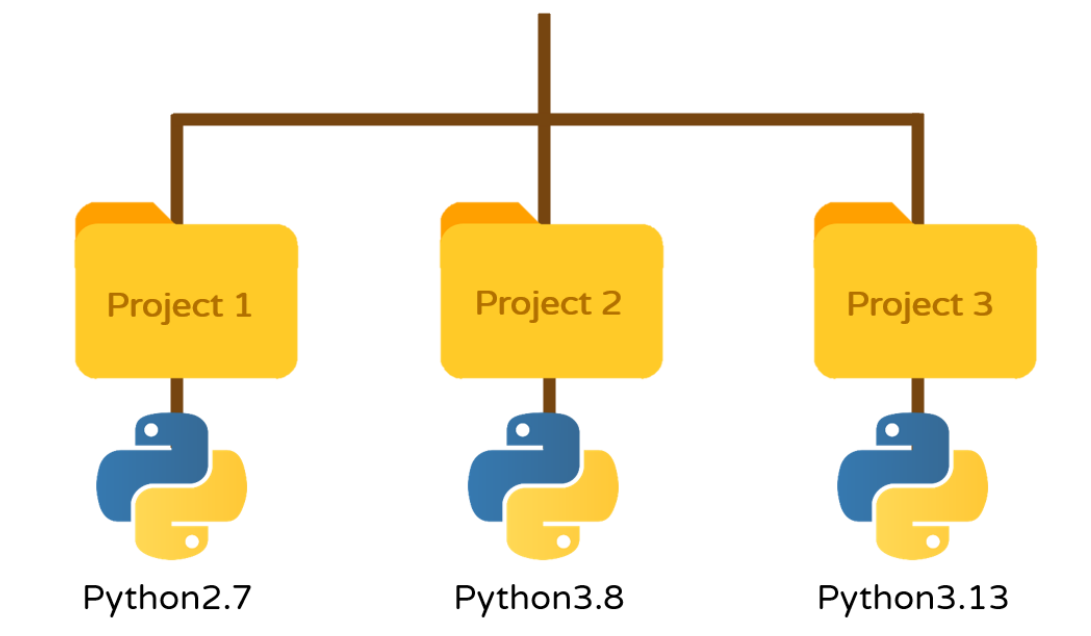
As you may already know, the most common way to install Python modules is by using the pip tool. By default, packages installed with pip are installed system-wide. This allows a user to access installed packages from any Python project on their machine. However, this approach has some drawbacks. Only one version of a package can be installed at a time, so all Python projects must share that same version.
This means that a project cannot benefit from updated modules if another project depends on an older version of the same package. To solve this issue, a dedicated folder is created for each project, where the required modules and their specific versions are installed locally. This allows different versions of Python and its modules to be used for different projects without causing dependency conflicts.
This is known as a virtual environment.
Installation steps
- Check that
pipis installed on your machine:
sudo apt-get install python3-pip- Install the
virtualenvwrapperpackage:
sudo pip3 install virtualenvwrapper- Once the module is installed, you need to add some configuration lines to your
~/.bashrc file(a terminal configuration file executed at each session startup). To do this, open~/.bashrcwith a text editor, for example using Visual Studio Code:
sudo code ~/.bashrc- After opening the file, add the following lines:
export WORKON_HOME=$HOME/.virtualenvs
export PROJECT_HOME=$HOME/Devel
source /usr/local/bin/virtualenvwrapper.sh
Save and close the file. You now have everything you need to start creating virtual environments.
Creating and using virtual environments
To create a virtual environment, run the following command:
mkvirtualenv venv_namewhere venv_name is the name you want to give to your virtual environment. If everything works correctly, you should see the environment name appear at the beginning of each terminal prompt.
Example:
mowibox@chroma:~$ mkvirtualenv my_venv
created virtual environment CPython3.12.3.final.0-64 in 170ms
  creator CPython3Posix(dest=/home/mowibox/.virtualenvs/my_venv, clear=False, no_vcs_ignore=False, global=False)
  seeder FromAppData(download=False, pip=bundle, via=copy, app_data_dir=/home/mowibox/.local/share/virtualenv)
    added seed packages: pip==25.0.1
  activators BashActivator,CShellActivator,FishActivator,NushellActivator,PowerShellActivator,PythonActivator
virtualenvwrapper.user_scripts creating /home/mowibox/.virtualenvs/my_venv/bin/predeactivate
virtualenvwrapper.user_scripts creating /home/mowibox/.virtualenvs/my_venv/bin/postdeactivate
virtualenvwrapper.user_scripts creating /home/mowibox/.virtualenvs/my_venv/bin/preactivate
virtualenvwrapper.user_scripts creating /home/mowibox/.virtualenvs/my_venv/bin/postactivate
virtualenvwrapper.user_scripts creating /home/mowibox/.virtualenvs/my_venv/bin/get_env_details
(my_venv) mowibox@chroma:~$
From this point on, any command you run (e.g. pip install) will take place within the environment, without affecting the rest of the system.
When you’re done working, you can deactivate the environment by running:
deactivateIf you want to use a specific version of Python installed on your machine, use the -p flag to specify it:
mkvirtualenv -p python3.x venv_namewhere x is the desired version number.
Note
Of course, this means you must have already downloaded the version you want!
To access an already created virtual environment, use the command:
workon venv_nameTip
You can list all available virtual environments by typing workon and pressing the Tab key twice:
mowibox@chroma:~$ workon
my_venv     my_other_venv    my_other_other_venv
Finally, to delete an inactive virtual environment, use the command:
workon rmvirtualenv venv_nameCredits
- Writer: Ousmane THIONGANE
- Latest update: June 2025
- Reviewer: